안녕하세요 보나에요~ 전에꺼에 이어서 해볼께요!


(1)을 보시고 싶으면 https://bonahbruce.tistory.com/76

여기로 들어가보세요!


kubernetes에 jupyter container 띄우기 ( azure 활용)

안녕하세요 본아에요~ 오늘은 portal.azure.com의 vm 안에서 aks, acr등을 활용하여 jupyter notebook을 올리는 작업을 한번 진행해 보겠습니다.(부족한 점이 많아요) 1. portal azure 로그인 후, 리소스 그룹을..

bonahbruce.tistory.com


전에거에서는, persistent volume이 없어서, jupyter에서 데이터분석을 열심히~ 했어도 

기록이 남아있지 않아요.... 말짱 도루묵.... 인거죠


왜냐면 k8s는 기본적으로 stateless한 클러스터를 구축하기 때문에

자기가 사용할 volume을 미리 만들어서 붙여주거나, (static)

아니면, pod를 띄우면서 dynamic하게 생성하는 방법이 있어요! 


동적으로 하는거는 아직 제가 서툴러서... 우선 제가 구현해본 static 버전으로 설명을 드려볼게요!!


우선 저는 public cloud 중 azure를 사용하고 있어요~!


그래서! 사용할 storage(창고)를 위해 storage account를 개설할거에요!


요렇게 생겨먹은것을 생성한 뒤,

access keys 부분으로 들어가셔서, key1 또는 key2를 복사해주세요


그 후,


kubectl create secret generic fileshare-secret --from-literal=azurestorageaccountname=bonahstorage --from-literal=azurestorageaccountkey=<key1입력> -n jupyter

이런식으로 secret을 생성해주면 됩니다!

여기서 

fileshare-secret = secret의 이름

bonahstorage = Azure에 있는 storageaccount 이름

<key1입력> = key에 있는 엄청 긴 값(여기에서 <>는 제거하고 넣으셔야되요)


자,,

그렇게 생성을 하고 나면

이제 yaml 파일 두개를 생성해야되요!


1. pv

pv는 이제 persistent volume이라고 해서, 실제 존재하는 pv를 명시하는 부분이고

2. pvc

pvc는 이제 요청을 하는거에요. 나 요런 저장공간을 갖고있는 pv를 붙이려고해!!

그러면 pv에 있는 저장소중 pvc에서 요청한 것에 충족되는 pv를 불러와서 inbound하게 됩니다. (제가 이해한바론..)


pv.yaml파일은 다음과 같이 생겼어요


kind: PersistentVolume
apiVersion: v1
metadata:
  name: fileshare-pv
  labels:
    usage: fileshare-pv
spec:
  capacity:
    storage: 10Gi
  accessModes:
    - ReadWriteMany
  persistentVolumeReclaimPolicy: Retain
  azureFile:
    secretName: fileshare-secret
    shareName: bonah
    readOnly: false

pvc.yaml파일은 다음과 같이 생겼어요

apiVersion: v1
kind: PersistentVolumeClaim
metadata:
  name: fileshare-pvc
  # Set this annotation to NOT let Kubernetes automatically create
  # a persistent volume for this volume claim.
  annotations:
    volume.beta.kubernetes.io/storage-class: ""
spec:
  accessModes:
    - ReadWriteMany
  resources:
    requests:
      storage: 10Gi
  selector:
    matchLabels:
      usage: fileshare-pv

두 yaml 파일을 모두 apply 해주세요!

kubectl apply -f pv.yaml -n jupyter
kubectl apply -f pvc.yaml -n jupyter

그 후, 다시 jupyter.yaml을 deploy 하면 됩니다! 아 ! 그전에!

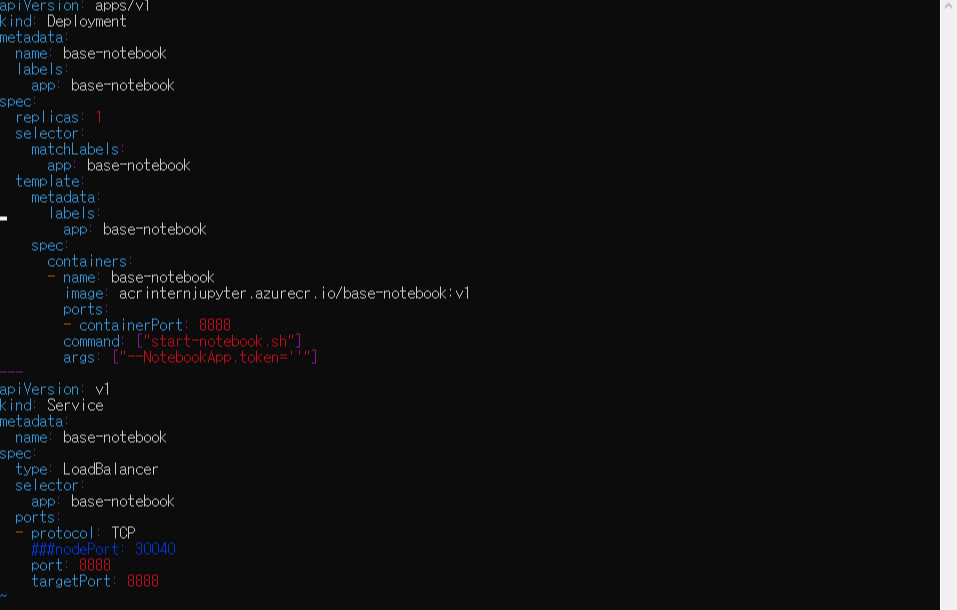
jupyter.yaml에서 deployment 부분을 살짝 추가를 해야 하는 부분이 있습니다.


apiVersion: apps/v1
kind: Deployment
metadata:
  name: base-notebook
  labels:
    app: base-notebook
spec:
  replicas: 1
  selector:
    matchLabels:
      app: base-notebook
  template:
    metadata:
      labels:
        app: base-notebook
    spec:
      volumes:
      - name: azure
        persistentVolumeClaim:
          claimName: fileshare-pvc
      containers:
      - name: base-notebook
        image: acrintern.azurecr.io/base-notebook:v1
        ports:
        - containerPort: 8888
        command: ["start-notebook.sh"]
        args: ["--NotebookApp.token=''"]
        volumeMounts:
        - name: azure
          mountPath: "/home/jovyan/work"

기존 yaml 형식에서 모두 같지만, persistentVolumeClaim이라는 부분이 새로 추가되었을거에요!


pv를 요청하는 pvc를 저희가 만든 pvc.yaml에서 fileshare-pvc라고 metadata name을 설정해놓았어요!(위에 보시면됩니다) 그래서 그 pvc를 불러오는거에요! 나 fileshare-pvc 레이블이 있는 pvc.yaml파일에서 생성한 그 claim을 쓸거야! 이런느낌입니다.


그리고 실행하면 pv가 붙은 jupyter notebook이 탄생하게 됩니다~~ 짝짝짝


다음에는, 저희가 loadbalancer를 사용해서 외부에서 접근가능하게 해준것을,

azure를 사용하면 제공해주는 domain name으로 변경해서 사용하는, 간편한 방법을 이용해볼게요!!

다음에 만나욥!

'IT > Kubernetes' 카테고리의 다른 글

helm을이용해 k8s에 kafka 설치하기!  (1) 2020.08.11
helm 설치  (0) 2020.08.11
kubernetes multiple cluster일때 cluster 옮기는 방법  (0) 2020.08.03
k8s 정리  (0) 2020.07.31
kubernetes에 jupyter notebook 띄우기 (1)  (0) 2020.07.15

안녕하세요 본아에요~


오늘은 portal.azure.com의 vm 안에서 aks, acr등을 활용하여


jupyter notebook을 올리는 작업을 한번 진행해 보겠습니다.(부족한 점이 많아요)


1. portal azure 로그인 후, 리소스 그룹을 할당받음(리소스 그룹안에서 vm, aks, acr등이 만들어짐)


2. vm (ubuntu 18.04) 생성


3. vm 상에서 azure-cli 설치


curl -sL https://aka.ms/InstallAzureCLIDeb | sudo bash
az login # Azure Cloud와의 연동

# 다음과 같은 문구가 뜬다.
#To sign in, use a web browser to open the page https://microsoft.com/devicelogin and enter the code HBCHP2AY5 to authenticate.


해당 url로 접속 후, 인증을 진행한다.


4. kubectl cli 설치

curl -LO https://storage.googleapis.com/kubernetes-release/release/`curl -s https://storage.googleapis.com/kubernetes-release/release/stable.txt`/bin/linux/amd64/kubectl
chmod +x ./kubectl
sudo mv ./kubectl /usr/local/bin/kubectl
kubectl version --client

5. docker 설치

docker는 기본적으로 root계정의 권한 아래에서 진행이 되기 때문에,

usermod를 활용하여 권한을 부여한다.

sudo apt install docker.io
docker version (client만 뜨고 server는 안뜬다)
sudo usermod -a -G docker AzureUser
sudo service docker restart
docker version
exit
docker version
docker ps -a # 컨테이너 아무것도 없음

6. Azure Container Resistory 생성

# rg-intern-2020 리소스그룹 내에 acrinternjupyter 라는 acr 생성
az acr create --resource-group rg-intern-2020 --name acrinternjupyter --sku Basic

# acrinternjupyter 리소스에 로그인
az acr login --name acrinternjupyter

rg-intern-2020 리소스 그룹내의 acr list 출력해서 보기
az acr list -g rg-intern-2020 --query "[].{acrLoginServer:loginServer}" --output table


7. docker hub에서 jupyter/base-notebook pull 해서 가져오기(image를 가져오는 것임)

# docker hub에서 jupyter/base-notebook 이미지 가져오기
docker pull jupyter/base-notebook

# 가져온 이미지에 태그 달기
docker tag jupyter/base-notebook acrinternjupyter.azurecr.io/base-notebook:v1

# 태그 단 이미지를 푸쉬하기(푸쉬를 하면 azure container repository로 들어가게됨)
docker push acrinternjupyter.azurecr.io/base-notebook:v1

# acr list 살펴보기
az acr repository list --name acrinternjupyter --output table

8. AKS를 생성하면서 acr과 붙이기

az aks create --resource-group rg-intern-2020 --name aks-intern-jupyter --node-count 3 --generate-ssh-keys --attach-acr acrinternjupyter

# kubectl 명령어가 먹도록 만들기 ( 이것은, kubectl 명령어가 만든 aks를 바라보도록 하는 명령어이다)
az aks get-credentials --resource-group rg-intern-2020 --name aks-intern-jupyter

9. jupyter namespace 만들어서 관리하기

kubectl create namespace jupyter

mkdir jupyter
cd jupyter
touch jupyter.yaml

kubernetes에 적용할 yaml파일 작성하기(deployment, services)


10. kubectl 명령어로 pods 띄우기

kubectl apply -f jupyter.yaml -n jupyter
kubectl get pods -n jupyter -w
kubectl get svc -n jupyter -w


여기까지가 정말 기본적으로 설치 및 주피터 노트북을 빠르게 띄우는 작업을 진행해 보았습니다.


다음 업로드 때에는, 영구 스토리지를 연결해서 하는 작업을 진행해 보도록 하겠습니다.


다음 업로드 - https://bonahbruce.tistory.com/91


kubernetes에 jupyter notebook 띄우기 (2)

안녕하세요 보나에요~ 전에꺼에 이어서 해볼께요! (1)을 보시고 싶으면 https://bonahbruce.tistory.com/76 여기로 들어가보세요! kubernetes에 jupyter container 띄우기 ( azure 활용) 안녕하세요 본아에요~ 오..

bonahbruce.tistory.com


'IT > Kubernetes' 카테고리의 다른 글

helm 설치  (0) 2020.08.11
kubernetes에 jupyter notebook 띄우기 (2)  (0) 2020.08.07
kubernetes multiple cluster일때 cluster 옮기는 방법  (0) 2020.08.03
k8s 정리  (0) 2020.07.31
cloud 관련 링크  (0) 2020.07.13

모든 프로그래밍 언어의 기초는 'hello world'를 출력하는 것이다.

# This program says hello and asks for my name. 
print('hello world!') 


이름을 묻고 input()함수를 활용하여 사용자가 적는 입력값을 받아서 myName 변수에 저장한다.

print함수는 출력하는 함수로서, 'string'과 myName(변수)를 같이 출력할 수 있도록 ,로 구분자를 주어 출력하였다.

print('what is your name?') 
myName = input() 
print('hello, Nice to meet you',myName) 


input 함수를 쓸때 주의할 점이 있다.

input 함수로 입력을 받는 모든 값은 'string'형식으로 저장이 된다.

따라서, 정수나 실수 값으로 입력값을 사용하고 싶다면, int나 float을 덮어써서 변환시켜 주어야 한다. 

x = int(input('정수 : ')) 
y = x + 1 


input으로 높이와 너비를 입력받아 넓이를 구할 수 있다.

length = float(input('length를 입력하시오:')) 
width = float(input('width를 입력하시오:')) 
print('area =',length*width) 


제어문


python의 제어문은 if 조건문 : 형식으로 이루어진다.

조건을 여러개 줄 때 , 조건문 안에 and or 과 같은 논리연산자가 사용될 수 도 있다.

또한, if,elif,else를 적절히 활용하여 조건문을 잘 조정해 줄 수 있다.

실습코드


입력함수와 제어문을 활용한 실습

# 7번 문제 

a_7 = int(input('Input the first number A:')) 
b_7 = int(input('Input the second number B:')) 
print('A is',a_7,'and B is',b_7) 
print() 
print() 
print('A + B =',a_7+b_7) 


# 8번 문제 
a_8 = int(input('첫 번째 숫자를 입력하세요:')) 
b_8 = int(input('두 번째 숫자를 입력하세요:')) 
print('첫 번째',a_8,',두 번째',b_8) 

# 9번 문제 
a_9 = int(input('첫 번째 숫자를 입력하세요:')) 
b_9 = int(input('두 번째 숫자를 입력하세요:')) 

if a_9 > b_9: 
    print('큰 수는',a_9) 
else: 
    print('큰 수는',b_9) 

# 10번 문제 
a_10 = input('당신의 혈액형은 A/B/O ? ') 
if a_10 =='A': 
    print('당신은 호수처럼 맑은 성격을 소유하고 있습니다.') 
elif a_10 =='B': 
    print('당신은 모든 일에 뜩운 열정을 쏟는 사람입니다.') 
elif a_10 =='O': 
    print('당신은 매사 밝고 쾌활한 성격의 사람입니다.') 


# 11번 문제 
a_11 = int(input('점수를 입력하세요:')) 

if a_11>=90: 
    print('*'*13,'\n축하합니다!\n당신은 창의적 컴퓨팅 과목 시험에 합격하셧습니다.\n'+'*'*13) 
else: 
    print('불합격입니다.\n다시 한번 시도하도록 합니다.') 


print('-----------------------') 
print('***  스위스 국제 금융   ***') 
print('-----------------------') 
password = 'abcde' 
a = input('Please enter your name       : ') 
b = input('Please enter your password  : ') 

if password ==b: 
    print('Your password',b, 'is correct') 
    print(a,'Welcome to Swiss International Bank!!!') 
    c = input('Please enter your e-mail address :') 
    print('The secure number has been sending to',c) 
else: 
    print('The password',b,'is NOT correct') 
    print('Your account is locked, sorry!') 


반복문 while

while은 반복문으로서, while 조건문 : 형태로 이루어 진다.


number = 0 
a = '★' 
while number<10: 
    number += 1 
    print(a*number) 


#1번문제 
a='★' 
number=1 
print('-'*18) 
print(a*1) 
print(a*2) 
print(a*3) 
print(a*4) 
print(a*5) 
print(a*6) 
print(a*7) 
print(a*8) 
print(a*9) 
print(a*10) 
print('-'*18) 


#2번문제 

cnt = 1 
while cnt <= 10: 
    print('*') 
    cnt = cnt + 1 

print() 
#3번 문제 
cnt = 1 
while cnt <=10: 
    print(cnt) 
    cnt +=1 
     
   
print() 
#4번 문제 
cnt = 10 
while cnt>=1: 
    print(cnt) 
    cnt -=1 
   
print() 


#5번문제 

cnt = 0 
while cnt<=10: 
    cnt+=1 
    if cnt%2 ==0: 
        print(cnt) 
    else: 
        continue 


print() 
#6번문제 


cnt = 0 
while cnt<10: 
    cnt+=1 
    print('파이썬은 {}번 재밋습니다'.format(cnt)) 


print() 
#7번문제 

cnt=0 
cnt_sum=0 
while cnt<10: 
    cnt+=1 
    cnt_sum += cnt 
    print('step {} => {}'.format(cnt,cnt_sum)) 

     
print() 
#8번문제 

while True: 
    num_1 = int(input('첫 번째 숫자를 입력하세요:')) 
    num_2 = int(input('두 번째 숫자를 입력하세요:')) 
    if num_1>num_2: 
        print('큰 수는 {}'.format(num_1)) 
    else: 
        print('큰 수는 {}'.format(num_2)) 


import random 

a = random.randint(1,20) 

print('안녕? 이름이 뭐야?') 
myName = input() 
b=0 
print('음.. '+myName+' 내가 문제 하나 낼께. 1~20사이의 숫자 하나를 내가 지금 생각하고 있어.') 
print('맞춰봐') 

while True: 
    if b>5: 
        print('{}번시도하셨으므로 이제 끝입니다..'.format(b)) 
        break 
    try: 
         guess = int(input()) 
         b+=1 
    except: 
        print('시도 잘못된 입력입니다. 다시해주세요.') 
        continue 
     
    if guess !=a : 
        print('땡!! {}번 시도하셨습니다.'.format(b)) 
        if a>guess: 
            print(guess,'보다 큰값입니다.') 
        elif a            print(guess,'보다 작은 값입니다.') 
         
    else : 
        print('정답!! {}번만에 맞췄네!!'.format(b)) 
        break 


a=0 
b=7 
while b>0: 
    if a<7: 
        a +=1 
        print('*'*a) 
    else: 
        b-=1 
        print('*'*b) 


import random 

cnt = 0 
a = [] 
while True: 
    cnt+=1 
    rand_num = random.randint(10,60) 
    a.append(rand_num) 
    b = set(a) 
    c = list(b) 
    if len(c)>6: 
        break 
     
    print('{}번째 번호는 {}입니다.'.format(cnt,rand_num)) 


'Data Anaylsis > python basic' 카테고리의 다른 글

클래스  (0) 2020.01.06
파이썬기초(5)  (0) 2019.12.31
파이썬기초(4)  (0) 2019.12.30
파이썬기초(3)  (0) 2019.12.26
파이썬기초(2)  (0) 2019.12.26

+ Recent posts